A full-screen recording makes your viewer hunt for the button you just clicked. Zoom in on that spot while you record, pan across to the next one, and they see exactly where to look without you narrating every pixel.
You can do it live as you capture, or add it afterward in the editor, and the right choice depends on what you are recording.
What Are Zoom and Pan Effects?
Zoom enlarges one part of your screen recording so a detail fills the frame, and pan slides that enlarged view across the screen to follow the action.
You almost never use one without the other. Zoom into a menu, pan over to the setting you’re changing, then pull back out so nobody loses track of where they are.
The phrase itself means different things depending on what you are recording.
On a phone, it is the pinch or slider that changes your camera lens mid-shot in apps like TikTok or Snapchat. On a video call, it can mean capturing your screen during a Zoom meeting.
The case we’re discussing in this article is the third one, zooming and panning inside a screen recording of your computer, which is where tutorials, demos, and product walkthroughs need it most.
When Should You Use Zoom and Pan?
Use zoom whenever a detail is too small to read at full-screen size, and use pan when the thing you are explaining moves from one part of the screen to another.
That comes up constantly. Maybe it’s a field in a form, one cell in a spreadsheet, a line of code, or a setting buried three menus deep. Whatever it is, it reads fine on the big monitor you recorded on and turns to mush the second someone watches on a laptop.
Pan is for when the action jumps around the screen. You click a button on the left, the result pops up on the right, and a pan walks the viewer from one to the other so they’re not scanning the whole frame to find it. It’s the same with a long process where each step shows up in a different corner.
You don’t need any of this for a talking-head video, for text that’s already big, or for a short clip where nothing’s hard to see. And zooming out of habit is one of the quickest ways to make a calm walkthrough feel twitchy.
Benefits of Zooming and Panning During Screen Recordings
Zooming and panning make a recording easier to follow, keep it readable on small screens, and let you cut it shorter by showing rather than describing.
It doesn’t matter much whether you’re making a tutorial, a sales demo, or a quick update for the team. The wins are the same.
- When you enlarge the exact spot you are talking about, viewers don’t need to guess where to look, which cuts down on the confused replies that async video is supposed to prevent.
- You can record on a large monitor and the zoomed sections still hold up when someone watches on a phone or a shared browser tab.
- Showing a detail up close replaces a sentence or two of explaining it, so the walkthrough shortens and more people watch it to the end.
How to Zoom In/Out & Pan While Screen Recording
You can zoom and pan live while you record, which bakes the movement into the file, or record flat and add a zoom effect afterward in the editor for more control.
Pick based on whether you want the zoom locked in as you record or something you can nudge afterward. Either way it’s a few steps, and nothing stops you from using both in the same video.
Method 1: Zoom and Pan Live While You Record
If you already know where you’re headed on screen, the fastest route is Focus Mode in the Dadan desktop apps for Mac and Windows. It zooms in and follows your cursor while you record, so the zoom and pan land in the file as you go.
Follow these steps:
1. Open the Dadan desktop app and choose your recording mode, either Screen & Cam, Screen Only, or Cam Only.
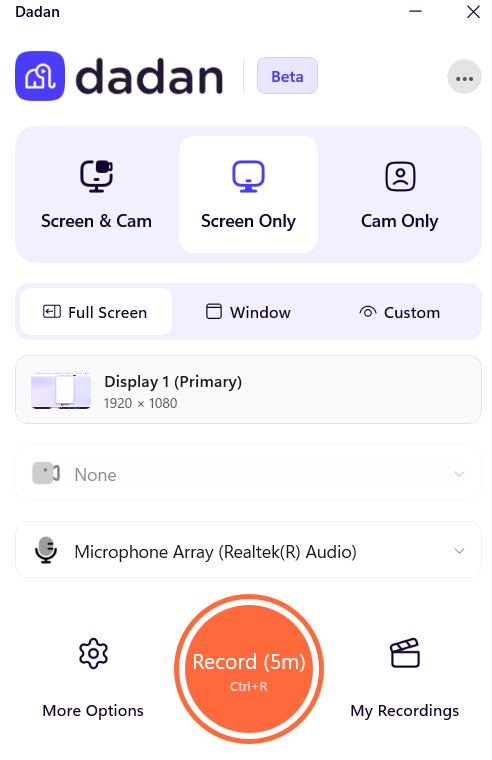
2. Select your capture area. You can record your full display, a specific window, or drag out a custom region. Then set your camera and mic.

3. Hit Record, or use the global shortcut ⌘ + ⇧ + R to start for Mac.
4. While recording, Dadan’s Smart Zoom automatically zooms in wherever you click, or you can activate it manually by pressing ⌘ + ⇧ + D to enable Focus Mode on Mac. The view zooms in and follows your cursor as you move across the screen. On Windows, click More Options and enable Focus Mode.
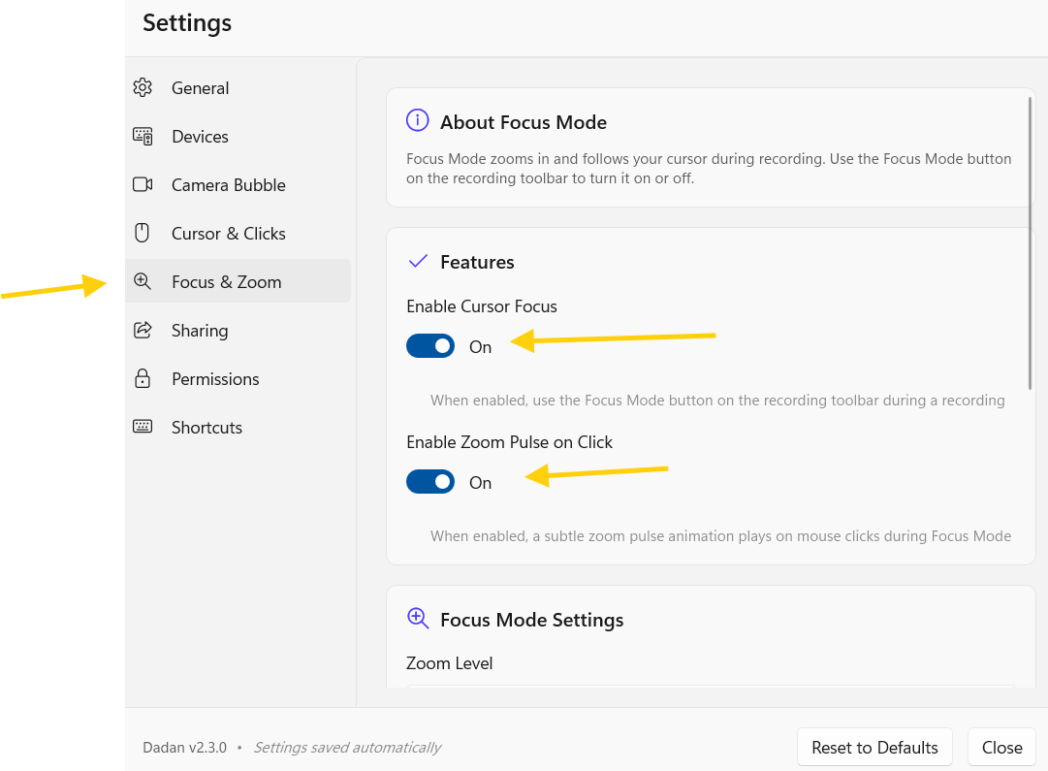
5. Release ⌘ + ⇧ + D to zoom back out. Hold it again whenever you need another close-up.
6. Stop recording with ⌘ + ⇧ + S when you’re done. Once processing finishes, a share link is copied automatically.
The zoom and pan are captured straight into the file, so there is nothing to edit afterward. The trade-off is that a mistimed zoom can only be fixed by recording again, so use this when you can afford another take.
Method 2: Add Zoom in the Editor After Recording
Record flat and add the zoom later, and you can put each move exactly where you want it. This one works on anything you’ve already got sitting in your library, too.
Follow these steps:
1. Open the recording and click the Video Editor button to launch Dadan Studio.
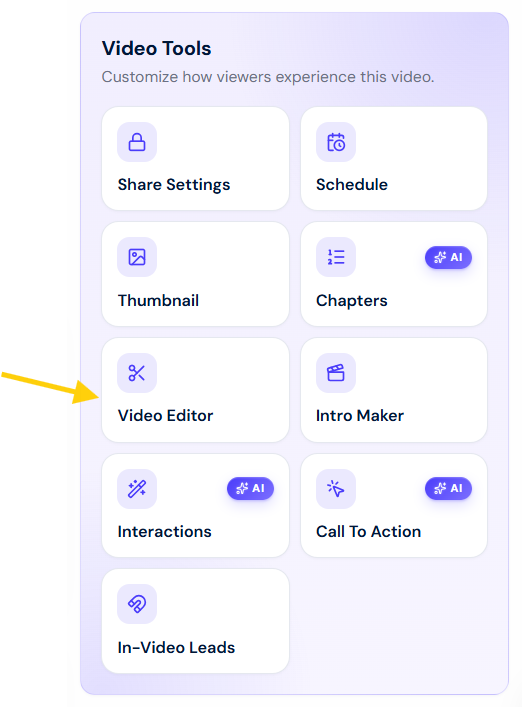
2. Move the playhead on the timeline to the moment you want the zoom to start.
3. In the Tools panel, click Zoom, then click the blue Add Zoom Effect button. A purple Zoom layer shows up on the timeline.
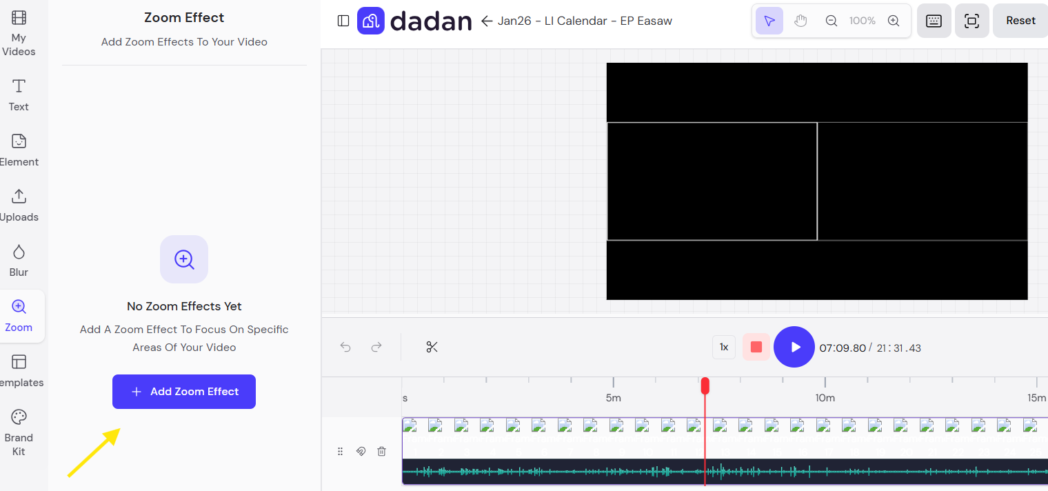
4. Click or drag the crosshair on the frame to set the zoom center over the area you want enlarged.
5. Set the magnification with the intensity slider. It runs from 1x to 3x and starts at 1.5x.
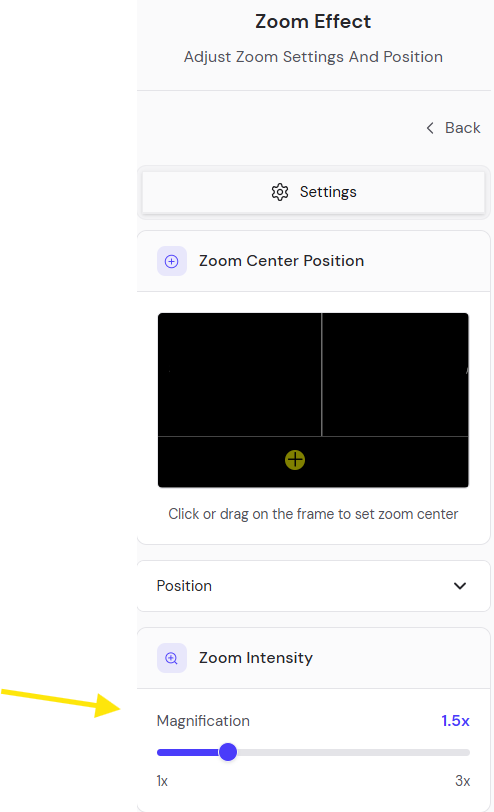
6. Drag the ends of the Zoom layer to control when the zoom starts, how long it holds, and when it lets go.
7. To shift focus somewhere else, add a second Zoom layer further along and set its center on the new spot. The view jumps there when that layer plays, and that’s your pan in the editor.
8. Click Save to overwrite the file, or Save & Duplicate to keep the original untouched.
Place editor zooms during natural pauses in the narration. The effect cuts in and out rather than gliding, so a zoom timed at a pause reads as intentional, while one dropped in mid-motion can feel abrupt.
Method 3: Zoom With Your Operating System’s Magnifier as a Fallback
If you are recording something with no built-in zoom, your computer can enlarge the whole screen live while your recorder captures what is shown.
On Windows, Magnifier opens with the Windows key and the Plus key and follows your pointer as you move.
On Mac, switch on zoom in the accessibility settings and scroll to magnify, and the view tracks your cursor. It works, but it enlarges everything at once and can look coarse when pushed far, so keep it as a backup rather than your default.
Common Mistakes to Avoid
The usual mistakes are zooming in too far, zooming too often, and forgetting to zoom back out. All three pull attention instead of steering it.
Almost all of them come down to overdoing it, and each one is an easy fix once you spot it.
- Zooming in too far cuts off the context. So start near 1.5x and climb only when the detail really needs it.
- Zoom too often and people tune out. A frame that keeps pushing in and pulling back gets tiring, so save the move for the two or three moments.
- The easy one to forget is zooming back out.
- A fast pan loses the eye. It can’t keep up with where the focus went, and the whole shot feels dizzy.
- A sloppy zoom center lands the close-up slightly off whatever you meant to highlight.
- An editor zoom dropped mid-motion reads as a glitch. Put it on a pause instead.
Zoom In vs Cursor Highlight: Which Should You Use?
Highlight the cursor when the target is already readable and you want to keep the context. Zoom in when the detail is too small to see, because highlighting can’t fix text nobody can read.
Both do the same job, which is pointing the viewer’s eye at the right spot. They simply go about it differently.
Zoom crops the frame down to the detail, so you’re changing what’s actually on screen. Highlighting, mouse tracking, and on-screen annotations leave the whole screen visible and draw a finger to the part that counts.
Dadan handles mouse tracking and on-screen drawing while you record, so you can point at something without cropping anything away.
When the detail is just too small, highlighting can’t save you. No arrow rescues text nobody can read. That’s a zoom’s job. On a really busy interface, do both. Zoom in to make the area legible, then highlight the exact element inside that closer view.
Why Dadan Makes Zoom and Pan Easy
Dadan does zoom both ways. There’s real-time zoom that follows your cursor while you record in the desktop apps, and an adjustable Zoom effect in the browser editor.
Plenty of tools make you choose between zooming live and zooming in an editor, or between recording in one app and editing in another. Dadan doesn’t. Its Mac and Windows desktop apps zoom in real time as you record and let the frame trail your cursor, so the pan happens while you work and there’s nothing left to fix once you stop.
If you’d rather record flat and sort out the moves later, the browser video editor gives you a Zoom effect with an adjustable center, an intensity slider from 1x to 3x, and a layer on the timeline you drag to set the timing.
Point a second zoom at a different spot and you’ve carried the focus across the recording. Since it all runs in the browser, you’re not exporting footage into a separate program just to add one zoom.
Conclusion
Zoom and pan are really just attention tools. They point the viewer at the right spot so your walkthrough clicks the first time, instead of coming back to you as a string of questions.
Zoom live when you already know where you’re going and want it done as you record. Use the editor when you’d rather fine-tune the timing and the framing after the fact. Keep the moves few and on purpose.
FAQs
How do you zoom in while screen recording?
You either use a recorder with real-time zoom or add a zoom effect afterward in the editor. In Dadan’s desktop app you zoom in during capture and the frame follows your cursor. If you recorded without live zoom, open the video in the editor and add a Zoom effect over the moment you want to enlarge.
Can I zoom into a screen recording after recording?
Yes. Open the recording in Dadan Studio, add a Zoom effect from the Tools panel, set the center point and intensity, then drag the layer to cover the right moment. Nothing about the original capture stops you from adding it later.
What is the zoom and pan effect?
Zoom enlarges part of the frame so a detail fills the screen, and pan slides that enlarged view across to follow the action. Together they guide the viewer’s eye from one area to the next without you having to describe every step out loud.
How do I highlight part of a screen recording?
Use cursor highlighting, mouse tracking, or on-screen annotations to draw attention while keeping the whole screen visible. Dadan lets you track the mouse and draw shapes on screen, which works well when you want context and a zoom would hide too much.
Can I add zoom effects online?
Yes. Dadan’s editor runs in the browser, so you add zoom effects without installing desktop software. Open the video, choose Zoom from the Tools panel, and set where and how much to magnify.
What is the best screen recorder with zoom effects?
The right one records and edits zoom in the same place, so you’re not moving files between apps. Dadan handles real-time zoom while recording on its desktop apps and a Zoom effect in its browser editor, which covers both the live and the after-the-fact approaches.
Should I use zoom effects in tutorial videos?
Yes, whenever a detail is too small to read at full-screen size. Zoom into the field, button, or line of code you’re explaining, then pull back out so viewers keep their place. Skip it when the text is already large enough to read comfortably.
How do I make screen recordings more engaging?
Direct attention instead of showing a static full screen the whole way through. Zoom into what matters, highlight the cursor, trim the dead air, and add captions so people can follow even with the sound off.
Can I combine zoom effects with annotations?
Yes, and they reinforce each other. Zoom into a region to make it readable, then annotate inside that closer view to point at the exact element. Dadan supports both zoom and on-screen drawing on the same recording.
Does Dadan support zoom and pan editing?
Dadan supports zoom both while you record and in the editor. During desktop recording the zoomed view follows your cursor, which is how panning happens live. In the browser editor you add Zoom effects and set a different center point for each, which shifts the focus across the recording.