Two things happen when you share a video resume with a recruiter. First, your application instantly stands out from a sea of traditional resumes. Second, and more importantly, you send a strong message to the recruiter: you’re confident, transparent, and unafraid to express your personality.
Your recruiters know you deeply even before a one-on-one interview. But like most first attempts, creating a video resume needs thoughtful planning and structure. That’s where we come in. Here’s a step-by-step guide to help you craft a video resume that leaves a lasting impression.
Plan Your Message (with Free Script/Template)
This is the first step in the planning process. Getting this one right makes the other two stages of the process a lot easier. To make sure that you get this right, we have shared 5 most useful tips and a template that will help you execute these tips quickly:
Write a Script
Make a solid plan for how you want the video to look and write a script detailing everything you want to say on camera. This will help you to stay focused, sound professional, and avoid rambling
Keep It Under 2 Minutes
Recruiters are busy people. Sifting through hundreds of resumes each day is tiring, too. So, respect their time. Keep your video resume between 30 seconds and 2 minutes. Aim for 150-180 words in your script, which must take 60-90 seconds of speaking time.
Focus on One Key Strength or Project
Rather than trying to cover everything, choose a single topic to highlight. Your video resume will be so short, it’s most effective to pick a single topic to focus on. Talk about a specific project you did very well on or demonstrate a specific skill.
Address What’s Missing from Your Written Resume
If you’re also sharing a traditional resume with the recruiter, use your video to showcase elements that couldn’t fit there. Talk about volunteer experiences, specific skills, or personality traits that relate to the job but weren’t captured in bullet points. This gives recruiters additional context they wouldn’t get otherwise
Practice Multiple Takes and Get Feedback
Don’t stress about getting the video recording right on the first attempt. Do multiple retakes. Record your video using different expressions and vocal tones to sound confident, polished, and comfortable. Don’t forget to ask your friends or family for constructive feedback before you finalize the video.
Ready-to-Use Video Resume Template
Here’s a streamlined template you can customize for your first video resume:
Opening (10-15 seconds)
“Hi [Company Name/Team], my name is [Your Name], and I’m excited to be considered for the [Position Title] role.”
Hook/Unique Value (20-30 seconds)
“What makes me uniquely qualified is [specific skill/achievement/experience]. For example, in my previous role at [Company], I [specific accomplishment with numbers/results]. This experience taught me [relevant skill] that directly applies to your [specific requirement from job posting].”
Connection to Role (15-20 seconds)
“I’m particularly drawn to this position because [specific reason related to company/role]. My background in [relevant area] and passion for [relevant field/industry] make me confident I can [specific contribution you’d make].”
Closing (10-15 seconds)
“I’d love the opportunity to discuss how my experience can contribute to [Company’s] success. Thank you for considering my application, and I look forward to hearing from you.”
Word Count: 120-150 words
Speaking Time: 60-90 seconds
Prepare Your Set-up
Having a good video setup means that your face and voice are clear and easily understandable. Don’t get nervous with the word “setup.” We are not asking you to take a studio for rent. These are simple tips, and anyone can do them.
Light Yourself, Not Your Background
This is a fundamental rule. Most first-time video creators use indoor lighting as the only source while shooting videos. This usually results in unpleasant shadows. Instead, position yourself facing a window for natural light, or invest in a simple desk lamp positioned in front of you. One Reddit user specifically advises turning off the ceiling fan lights as they have a warmer temperature. It can mix with the natural daylight and cause weird yellow tints to appear on the video. One last rookie mistake that you must avoid: Having windows behind you. When there is a bright light source behind you, it creates a silhouette effect that makes you look dark.
Get Your Audio Right with a Simple Test
Always make sure that you use earphones with a mic and they are plugged in all the way. If they are not connected well, your voice will still get recorded from the PC mic, which is fine. But if you’re sitting a bit away from the PC, your voice might not be clear or appear low at times. Once the cables are secure, record a few lines at the volume you will deliver when recording using a mic tester. Then hear it back and adjust accordingly.
If you notice an echo in the audio, hang up some clothes or blankets. If that’s not possible, simply record in a room with soft furnishings (carpets, curtains, furniture) to reduce the echo.
Stabilize Your Shot and Frame It Properly
The simple rule about framing is that you get the camera on a level surface. It doesn’t need to be a tripod, but make sure whatever your camera is on a flat level. Keep the phone or PC webcam slightly above the eye line, and angled downward. This way, it’s easy to maintain confident eye contact with the viewer.
Recording Best Practices
You know how to write a script and how to set up the camera. Now, here are some handy tips that you will find useful for recording the video, especially if it’s your first time.
Warm Up Before Recording
We found this hack on Reddit; it makes total sense. Here’s what the Reddit user shares in their post: Before you hit record, go on a call with one of your friends. You don’t need to tell them why or anything, but just have a chat for a while. Because you’re actually talking to someone, you’ll feel more relaxed while speaking in front of the camera.
Look Directly Into the Lens, Not at Yourself
This is a common problem, especially when recording video using a webcam. As the face appears on the laptop screen, many people start looking at the screen instead of the camera. They frequently check themselves out, and their eye contact rapidly shifts between the camera and the screen. It makes the video appear unprofessional. One effective way to overcome this is by covering the screen during recording. Then maintain about 70-80% eye contact with the camera lens, then occasionally look away naturally, just like in a real conversation
Speak Slower Than Feels Natural
You might feel nervous in front of the camera, but don’t let that nervousness show up in your speech. Instead of rushing, deliberately slow down your speech. This demonstrates control, command, and expertise, and you calm yourself in the process. Practice speaking at half your normal speed; it will sound normal on playback.
Place a Photo Behind Your Camera
This technique works for those who are uncomfortable staring at the camera lens. Keep a photo of your favorite person behind your camera lens, but not too high above it or far back from the camera. As you record your video, talk directly to that person.
Do a Quick Test Recording First
Always do a practice run. Record a 30-second video, check the audio quality, framing, and lighting issues. Most of the time, you will come across something off. But don’t let that discourage you. In fact, it’s a good sign; you can fix it, and then record a second version and check again. Keep doing it until you have what you were looking for.
Turn Off Phone Notifications
Switch on the “Do Not Disturb” mode on your phone and computer to avoid notification sounds during recording. A sudden ping or buzz interrupts your flow, and if you’re not careful, it might remain in the final version of the video resume you share with the recruiter.
Give Yourself a Few Seconds Before Speaking
Use this buffer technique: Hit record, take a deep breath, compose yourself for 3-5 seconds, then begin speaking. This gives you clean audio to work with and helps you start strong rather than fumbling into your opening line.
Practice Your Opening Line Until It’s Automatic
The first 15 seconds of your video resume largely determine the success. Therefore, we recommend rehearsing your introduction until it flows naturally. Start with a hook if you can, and then cover all your planned points so you deliver a strong message from the start
Record in Short Segments If Needed
For beginners feeling overwhelmed, break your script into smaller chunks. Record one section at a time, then edit them together. This reduces pressure and allows you to nail each part individually rather than worrying about a perfect full-length take
Editing & Final Touches
Alright, you have made it to the last step of the process: editing the video. Editing can seem scary, but we’re not producing a film here. Your video is only 90 seconds long, and if you follow the tips here, you will sail through just fine.
Trim Out Awkward Pauses and Mistakes
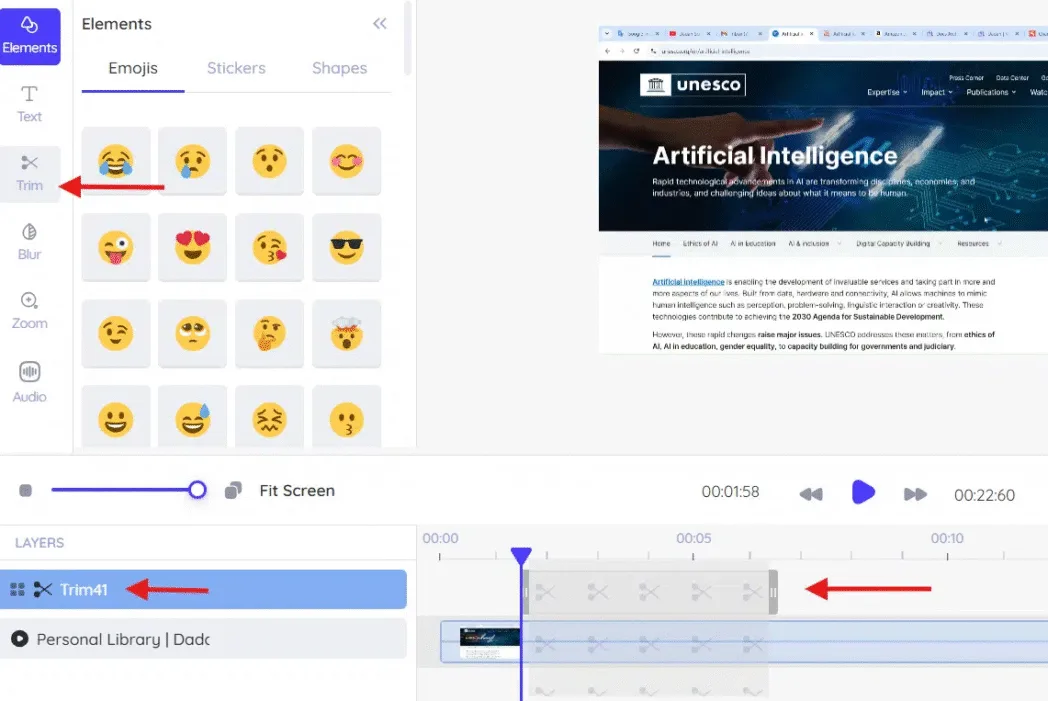
The most impactful edit you can make is removing dead air and fumbles from your recording. There are no silent gaps between sentences, which keeps the pace lively and maintains the recruiter’s interest. Dadan’s trimming feature helps you with that by simply dragging the sliders to the desired length.

Add Professional Text Overlays
You can include your name, target position, or key qualifications as text overlays to reinforce your message. This is especially useful at the beginning of your video to immediately establish context for recruiters. Dadan’s built-in editor is useful here as well. Choose a font type and size of your choice, type your text and decide how long you want to display it on the screen with the help of the sliders, just like the above.


Zoom in for Emphasis
Sometimes you want to draw attention to specific moments in your presentation. Perhaps when you’re discussing a particular achievement or showing enthusiasm about the role. Strategic zooming can help emphasize these key points and create visual interest.
With Dadan’s Zoom feature, you can highlight these important moments even if you have not done it before. Tap on the Zoom option on the editor page, and choose the zoom level you want to apply. The higher the level, the higher the zoom.

Fine-tune Audio Levels
Consistent, clear audio makes your video resume sound more professional, even if your recording environment wasn’t perfect. Adjusting volume levels ensures your voice comes through clearly without being too loud or too quiet.
Dadan allows you to add a volume layer just above the video timeline to help you make adjustments exactly where you want to apply them.

Your Next Step Starts Here
Creating a video resume overwhelms most of us. It takes a bit of effort to sit in front of the camera and talk about yourself. But, you know, this is an investment. When you look confident in front of the camera, you automatically catapult the chances of getting selected.
In this blog, you’ve learned how to plan your message, set up your recording, and polish your video with simple, effective editing techniques. Now it’s time to take that first step.
Ready to bring your video resume to life? Head over to dadan website and start today.


